Saturday, August 29, 2015
Friday, May 1, 2015
I'm Bringin' Hexy Back....I'm Too Hexy for this shirt ....Let's talk about Hex Bab-y!
I am sure you are dancing around like Justin Timberlake, while humming some Salt N Peppa probably tearing your house up searching for your Right Said Fred CD right about now to relive the 90's.
I tend to have that affect on people.
To say I am a bit obsessed with hexagons and all these popular geometric patterns everywhere is an understatement! I have been a kid in a candy store at work with so many new great shapes, sizes and colors being introduced from some of our popular lines like Pratt & Larson and Oceanside Glass and the Vihara EHex from Sonoma Tilemakers. Let's not even get started on my addiction to fabric- I should not even be allowed in to a fabric store anymore, you have seen my craft room and the fabric obsession...
I decided to try out the Elongated Hex Shape in a burp cloth instead of my normal kidney shape pattern.
First... I traced out the E- Hex on drawing paper and the hubby was gracious enough to cut the pattern out of 1/4" plywood for me so I had a good solid pattern to work with.
When I started sewing more burp cloths for friends and for people through word of mouth from friends I bought a roll of twill fabric labels from an Etsy shop called Inked Papers she was great to work with as I just wanted a simple "Emma Pye" to put on the burp cloths, next time I will probably order for a larger seam allowance...but for the first go, I'm happy with how they look when sewn in.
I tend to have that affect on people.
To say I am a bit obsessed with hexagons and all these popular geometric patterns everywhere is an understatement! I have been a kid in a candy store at work with so many new great shapes, sizes and colors being introduced from some of our popular lines like Pratt & Larson and Oceanside Glass and the Vihara EHex from Sonoma Tilemakers. Let's not even get started on my addiction to fabric- I should not even be allowed in to a fabric store anymore, you have seen my craft room and the fabric obsession...
I decided to try out the Elongated Hex Shape in a burp cloth instead of my normal kidney shape pattern.
First... I traced out the E- Hex on drawing paper and the hubby was gracious enough to cut the pattern out of 1/4" plywood for me so I had a good solid pattern to work with.
These burp cloths were being made for a boy. I chose two fabrics that had navy blue and white. I typically either use cotton chenille or terry cloth for the backing. The cotton chenille definitely is softer and heavier but it is hard to find at local fabric stores so I typically wait until I get a coupon from fabric.com and buy several yards. I do have to say that terry cloth is easier on my machine-I think... that could also just be user error...because let's be honest here...my only sewing "classes" were in 6th grade. The one thing I remember above all is to always back stitch once I start sewing, everything I else I am probably doing wrong...
FAKE IT TIL' YOU MAKE IT, RIGHT?
I used cotton chenille for these burp cloths.
Once cut, I pinned the outer sides together and sewed the perimeter, leaving about a 2 inch opening to flip inside out and sew Emma Pye Ribbon in
When I started sewing more burp cloths for friends and for people through word of mouth from friends I bought a roll of twill fabric labels from an Etsy shop called Inked Papers she was great to work with as I just wanted a simple "Emma Pye" to put on the burp cloths, next time I will probably order for a larger seam allowance...but for the first go, I'm happy with how they look when sewn in.
Not only am I obsessed with hexagons right now, I am LOVING some orange and POPS of color so I used an orange thread to border all these bad boys and I love the way they came out!
And VOILA! the first ever E HEX Burp cloth 6 pack.
I hope you a.) feel a little smarter after reading this post or b.) at least feel like it was time better spent than reading something on the lastest Kardashian drama
Meaghan
share: facebook | twitter | pinterest
Labels:
burp cloths,
fabric,
sewing,
six pack
Thursday, April 30, 2015
Happy Birthday Nana!
Today you would have been 86. This picture was taken 2 years ago- it makes me laugh every time I look at it. All through dinner that evening you kept asking, "who's birthday is it?" And we kept telling you but it never sunk in... even as you were blowing out the candles you were asking... we were all in stitches and Aunt Bonnie's face says it all! It is these memories and so many more that bring a smile to my face. Even when you had no clue what was going on you managed to light up the room with your smile and laughter.
Love you and Miss you
-Meags
Friday, March 27, 2015
TILE FO’ LIFE
I feel like I should have the phrase “tile fo life”tattooed on my knuckles-that’s how dedicated I am 
I started in the tile industry 8 + years ago, before then I had worked in countertops and before that it was culinary school and event planning… I know a very random mix! I can honestly say I love what I do everyday. I get to be creative, I get to be social and I get to work with beautiful materials.
I always hate seeing beautiful tile samples thrown out- what a waste. I try to save as many samples as possible to either donate or use on a rainy day…
I was lucky enough to get a larger office a few months ago…I had a huge wall that I needed to fill and artwork is expensive so I took it in to my own hands….
All in all the project cost less than $15. The only thing I purchased was some mastic. I had scrap wood that I traced basic letters on and they were about 16” in height. I painted the edges and backs of each letter with some grey paint I had left from another project. David cut the letters for me as well as routed out the picture hangers in the back. Routing out the hangers was key so the letters hung completely flush on the wall.


PRO TIP: the construction paper templates also came in handy when I was ready to hang the finished product. I marked where the hangers were and taped them to the wall, put a level and then drilled holes through the paper.
I let the tiles set for a day and then I grouted with Mapei’s Flexcolor CQ. The grout was perfect for this project as it was premixed and I didn’t have to do anything except pop open the lid, stir and just start spreading. Because I used such a mix of tiles, there were different heights to contend with but I was able to really shape the grout once it set a bit more and then I just took a dry sponge and brushed the excess off.
I love the way it turned out!
I started in the tile industry 8 + years ago, before then I had worked in countertops and before that it was culinary school and event planning… I know a very random mix! I can honestly say I love what I do everyday. I get to be creative, I get to be social and I get to work with beautiful materials.
I always hate seeing beautiful tile samples thrown out- what a waste. I try to save as many samples as possible to either donate or use on a rainy day…
I was lucky enough to get a larger office a few months ago…I had a huge wall that I needed to fill and artwork is expensive so I took it in to my own hands….
All in all the project cost less than $15. The only thing I purchased was some mastic. I had scrap wood that I traced basic letters on and they were about 16” in height. I painted the edges and backs of each letter with some grey paint I had left from another project. David cut the letters for me as well as routed out the picture hangers in the back. Routing out the hangers was key so the letters hung completely flush on the wall.
I traced each letter on construction paper and cut out a template. Once I figured out what tiles I was going to put where- I then transferred them to the construction paper so I could apply the mastic with a trowel and then set the tiles in place.
PRO TIP: the construction paper templates also came in handy when I was ready to hang the finished product. I marked where the hangers were and taped them to the wall, put a level and then drilled holes through the paper.
I let the tiles set for a day and then I grouted with Mapei’s Flexcolor CQ. The grout was perfect for this project as it was premixed and I didn’t have to do anything except pop open the lid, stir and just start spreading. Because I used such a mix of tiles, there were different heights to contend with but I was able to really shape the grout once it set a bit more and then I just took a dry sponge and brushed the excess off.
I love the way it turned out!
And because I had more tiles to use up I made a “W-I-N-E” version for some friends in CA
Tile On!
-Meaghan
share: facebook | twitter | pinterest
Labels:
craft projects,
mosaic,
tile
Saturday, March 14, 2015
A craft room with a view…
What makes specific memories stand out over others…if they are not traumatic or “life-changing” what is it that makes you remember something, even the littlest thing over all the other hundreds and thousands? Why is it that sometimes you can remember the stupidest things from years and years ago like what socks you were wearing or song you were listening to but have a hard time remembering something that happened last week?
I have no clue how old I was… if I were to guess I would maybe say 9 or 10…I think we lived in North Stamford at the time. I don’t know if it was a neighbor or a friend from school but all I remember is going to their house and in their basement they had an art room…I remember rolls of paper and a huge craft table in the middle of the room. I do not know how to explain the feeling, the excitement to have a whole space dedicated to creativity..
I have always wanted a “craft” room but realistically if you have extra space it is usually used for a guest room, office etc. I mean I have always had one of those plastic carts with drawers that held a random assortment of papers,scissors,the occasional tube of glitter and some glue.
I learned to sew in middle school…I remember going home and telling my mom I “NEEDED” a sewing machine. I got a very basic singer model. I could thread it, wind a bobbin and I knew to backstitch when I started something and I also remember that I would take old pillowcases and then make pillows out of them- so literally I was cutting a pillowcase down to a smaller version- stuffing it with polyfill, sewing 3 1/2 sides and then hand sewing the rest and I thought I was Martha Stewart!
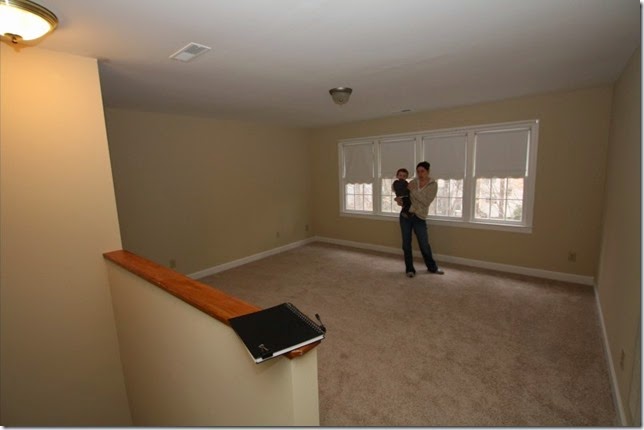
2 years ago we were lucky enough to find an awesome house around the corner from some of our best friends, in an incredible, established neighborhood. The house was a foreclosure but it only had one owner- EXACTLY what we wanted…something we could update on our own-but that had great bones. This house had all that we wanted…4 bedrooms, a bonus room(to be turned in to an awesome playroom!) pretty open on the first floor etc. The first time we walked the house-we got to the master bedroom, there was a door and we were completely surprised to see that the door opened to a finished 3rd floor with a wall of windows and 2 additional rooms that were perfect for storage. David and I threw ideas back and forth of what this space could be… he REALLY wanted a golf simulator (SURE…) while I was just thinking of a finished space to “escape”. The 3rd floor is only accessible through the master bedroom which also makes it unique. This is the space BEFORE:
After getting the house, redoing the kitchen and A LOT more….I was finally able to focus on the space and seeing that I have ALWAYS wanted a craft room I was able to convince David that really that is what it was meant to be…
I LOVE, LOVE,LOVE this space! I also love that I created a space for Max so when I go up to sew or work on a new project, he can also work on painting or coloring or drawing on the large chalkboard we put up…We have every paint you can imagine and stamps galore and it makes me smile because this is the space I have ALWAYS wanted. I am also lucky enough to have a husband that is pretty handy…David built me my quilting table, hung my pegboard and also designed and hung my wrapping paper and ribbon wall….
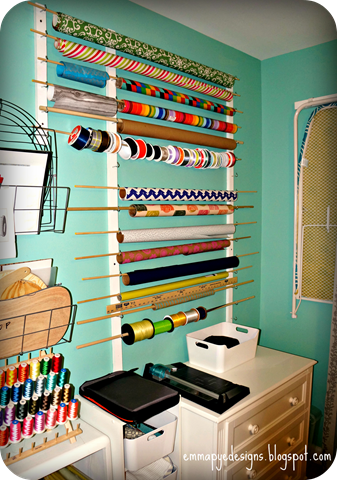
I will definitely have to write a post on the attic room off of this room that David has turned in to a train room for Max….Stay tuned!
The peg board wall is awesome because you can get all types of acrylic shelves and metal hooks to really customize the space, and the pegboard itself is CHEAP!
We found a cheap table on craigs list for about $25 that gave me a large laminate top, then David built the walls and shelving to hold all my fabrics, etc.
IKEA and the Container Store have been my BFF’s as I have found great bins to hold fabric and all types of craft supplies. Cube shelving that you can find at Target, Lowes, Wal Mart etc. is awesome too and I pretty much used it to line the whole room and then bought various bins and baskets to fill in the 12x12 spaces…
I have to say that one of my most cherished pieces in the space is the aluminum/laminate table next to my sewing table…
Nana and I bought this at a flea market in Greenwich about 13 years ago- I fell in love with it, the minute I saw it and I remember we had to completely disassemble it to get in her small Toyota, but in true “Mayor Terry” fashion, there were at least 4 people helping us get the table in the car. I used it as a kitchen table at a small apartment in VA Beach, it was stored in my parents garage for a few years and my dad used it as a work table(covering it as not to damage it) and then it was brought home to the craft room a little over a year ago. We cleaned it up and David put all new hardware on it to make sure it was stable.
Just another reminder of Nana and how she still inspires me in my craft room with a view….
-Meaghan
share: facebook | twitter | pinterest
Labels:
craft room,
hideaway,
hubby love
Friday, February 27, 2015
Thursday, February 26, 2015
Snow Day 2015!
Subscribe to:
Posts (Atom)


